Virtual Appliance Installation
We support two installation modes:
- Virtual Machine: customer provides a ready-to-use VM. Avalon team will grant you access to our server to download an installation archive. The archive size is approximately 70 MB (Fall 2025).
- Virtual Appliance: Avalon provides a pre-packaged Virtual Machine. Avalon team will grant you access to our server to download the Virtual Appliance image. The image size is approximately 3 GB (Fall 2025).
Note
We filter access to our servers so that only known customers / partners have access to the repository.
We will need the public IP address (or range) that will be used to download the archive/image.
Virtual Machine
Requirements
- Linux distribution: currently (Fall 2025) we support Ubuntu, Red Hat and CentOS distributions.
- User account: A user account on the Virtual Machine with sudo privilegies. We require sudo privilegies because we will need to:
- Create a new user with limited privilegies and a restricted shell → mandatory step
- Create systemd services to ensure the application is always up and running → mandatory step
- Customize Docker service → mandatory step
- Open ports on your Virtual Machine → optional, could be skipped if your system administrator handle this part.
-
VM minimum specifications:
- 4 vCPUs
- 8 GB of RAM
- 80 GB of disk space:
/var/libshould be at least 20 GB/tmpshould be at least 6 GB
Note
With this specification, Avalon runs smoothly up to 1000 devices.
-
Connectivity: Internet access, even temporary, will ease the installation process but a custom procedure could be arranged upon request for very sensitive environments.
- Avalon deployment archive: Avalon's team will provide the required tar archive to setup your VM if you cannot download it via our servers.
VM specific procedure
In the Virtual Machine (VM) mode, you will need to use our deployment package to install all our components on your VM.
User action required
Copy the Avalon deployment archive avalon-deployment.tar.gz to the home directory of a user with sudo privileges.
Extract the contents of the archive
mkdir avalon-deployment
tar -zxvf avalon_deployment.tar.gz -C avalon-deployment
cd avalon-deployment
Launch installation playbook
sudo ansible-playbook -i inventory.yml avalon_install.yml -e installation_mode=vm
This playbook will perform all required configuration on the VM and create a user with limited privilege/shell on the VM. You will use this user to install Avalon.
You can now follow the Virtual Appliance (VA) procedure.
Virtual Appliance
Specifications
Our current (Fall 2025) VA has the following specifications:
- 4 vCPUs
- 8 GB of RAM
- Disks:
- System disk: 40 GB
- Application disk: 120 GB
-
3 Network cards
Note
With this specification, Avalon runs smoothly up to 1000 devices.
Procedure
Info
Most parts of this procedure are shared between the VM and VA installation options.
Differences will be highlighted.
Import the VA via your hypervisor
User action required
Follow your hypervisor's documentation to import the VA.
Connect to the appliance through KVM
Use your hypervisor’s KVM to access the VA's console.
VA/VM difference
In VM mode, you can also log in through SSH if available.
Mandatory input
login: avalon-user
password: avalon
avalon-user password
You can and should change avalon-user password though this user has very limited privilegies.
You should see the Avalon logo, the initialization script starts right after login:
avalon-user@------'s password:


                      %=                      %%%%%%
                    %%%===                    %%%%%%
                  %%%%%=====                 %%%%%%%%   %%%%%   %%%%%   %%%%%      %%%%        %%%%%%%%%    %%%%%   %%%%
                %%%%%%%=======              %%%% %%%%%   %%%%   %%%%   %%%%%%%     %%%%       %%%%%%%%%%%%  %%%%%%% %%%%
        %%     %%%%%%%  =======     ==     %%%%%  %%%%    %%%% %%%%%   %%%%%%%%    %%%%      %%%%     %%%%% %%%%%%%%%%%%
        %%%%%  %%%%%      =====  ====      %%%%%%%%%%%%   %%%%%%%%%   %%%%  %%%%   %%%%     %%%%%      %%%% %%%%%%%%%%%%
         %%%%%%%%%%%      ===========     %%%%%%%%%%%%%%   %%%%%%%   %%%%%%%%%%%   %%%%      %%%%     %%%%% %%%% %%%%%%%
          %%%%%%%%%%      ==========     %%%%       %%%%   %%%%%%%   %%%%%%%%%%%%  %%%%%%%%%  %%%%%%%%%%%%  %%%%  %%%%%%
           %%%%%%%%%      =========     %%%%%        %%%%   %%%%%   %%%%     %%%%  %%%%%%%%%   %%%%%%%%%    %%%%   %%%%%

Last login: -

╔══════════════════════════════════════════════════════╗
║              AVALON CONFIGURATION SETUP              ║
╚══════════════════════════════════════════════════════╝
Initial configuration detected.
❖ Enter the FQDN [localhost]:
Initialization script
Introduction
The initialization script is a text-based application that will allow you to configure and edit the appliance settings:
- Define the appliance FQDN
- Configure the subnet used internally by Avalon App containers
- Configure the appliance network interfaces (VA mode only)
- Configure additional network services such as DNS and NTP
Note
At the end of the first configuration, Avalon Manager will automatically be started.
Check the Avalon overview section if you don't know yet what Avalon Manager is.
Workflow
Here under is the step by step workflow to configure your Virtual Appliance.
╔══════════════════════════════════════════════════════╗
║              AVALON CONFIGURATION SETUP              ║
╚══════════════════════════════════════════════════════╝
Initial configuration detected.
❖ Enter the FQDN [localhost]:
Note
You must define a FQDN, if one is already configured then just press enter to use it, otherwise type in the FQDN for the VA.
This FQDN should resolve to the IP address that you will configure for the VA.
Next, you will set up the containers’ internal network.
This network should use a /27 subnet. You do not need to specify the subnet mask.
A default gateway is required to allow communication with your network.
The script will ensure that the gateway belongs to the subnet.
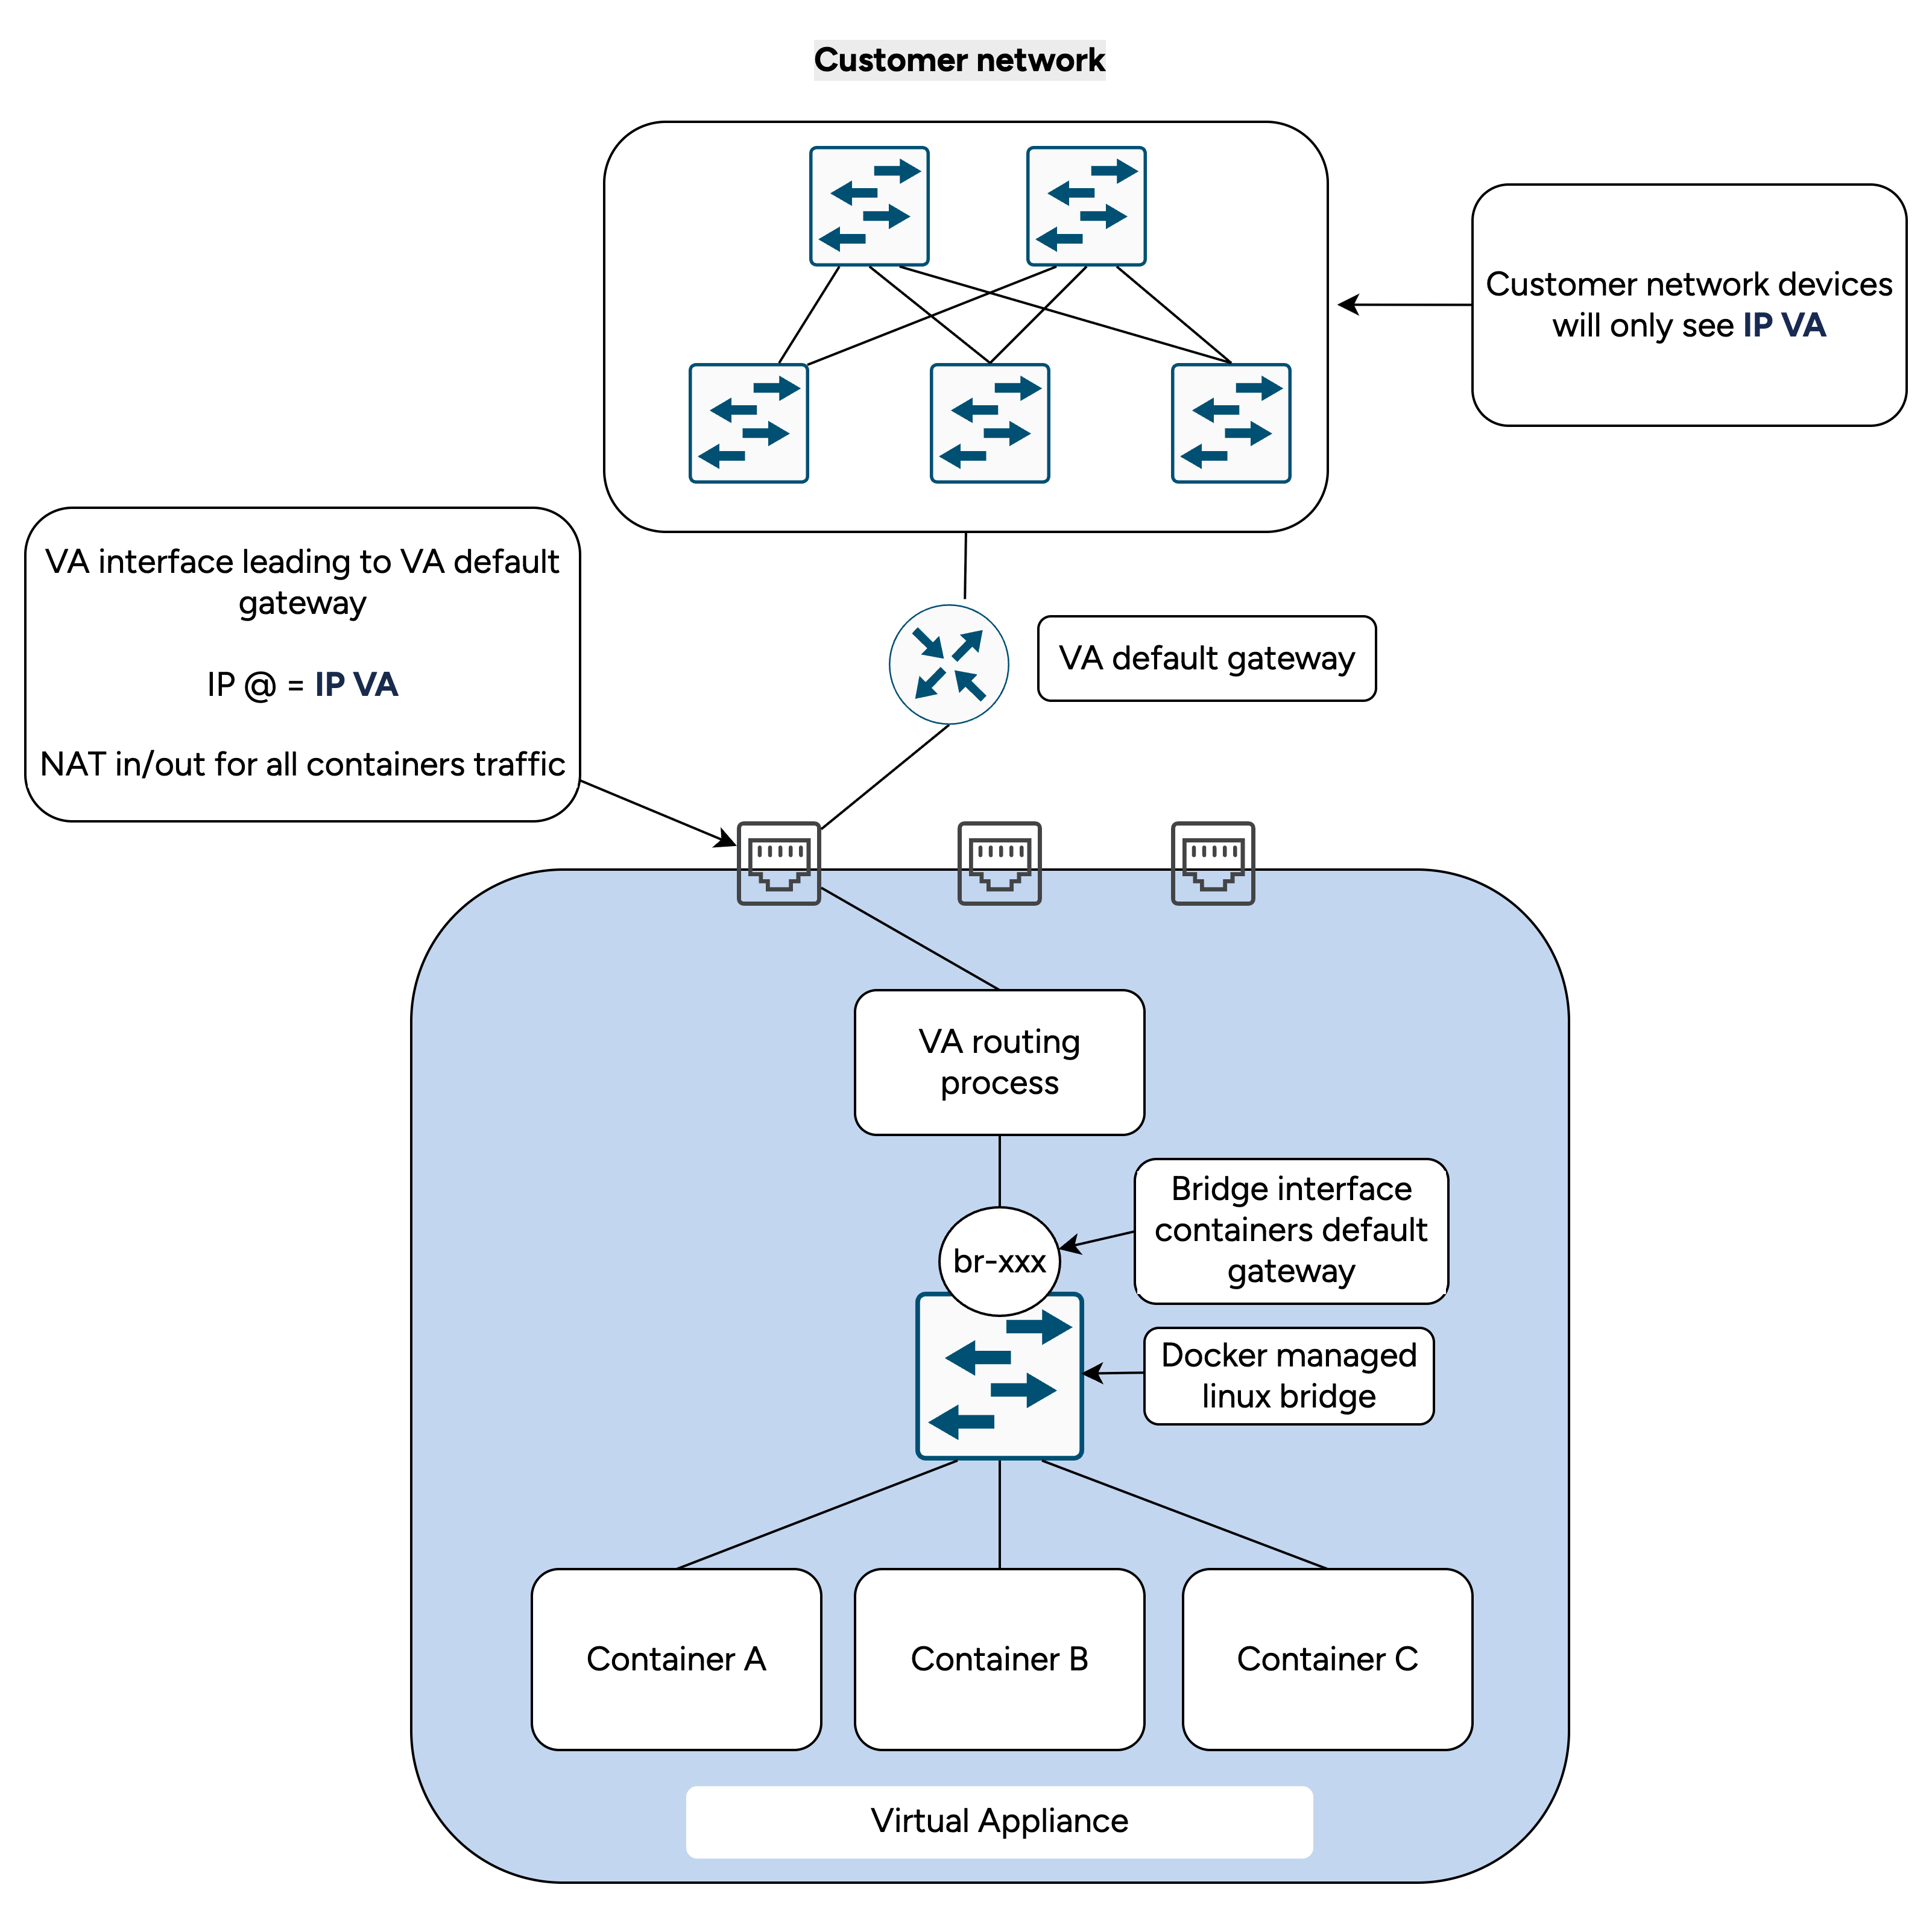
All traffic entering or leaving the containers’ internal network will pass through the Virtual Appliance’s NAT process. The source IP will be the one assigned to the VA interface connected to the default gateway.
Note
This network has not to be accessible from the rest of your network as it will not be used to access your devices or servers.
Default docker bridge running the 172.17.0.0/16 subnet is disabled.
✅ FQDN set to: va1.avalon-nap.com
❖ Enter a /27 subnet for the application internal network: 172.16.0.0
✅ SUBNET set to: 172.16.0.0/27
❖ Enter the gateway IP: 172.16.0.30
✅ Gateway set to: 172.16.0.30
You will then be asked to configure the VA network. You can configure more interfaces later as well as static routes. In this example, we will configure a single interface and a default gateway.
Danger
You wont be able to change the production interface in either VA or VM mode once selected!
--- Available Interfaces ---
[1] enp0s3 - MAC: 08:00:00:00:00:01 - IP: None
[2] enp0s8 - MAC: 08:00:00:00:00:02 - IP: None
[3] enp0s9 - MAC: 08:00:00:00:00:03 - IP: None
❖ --- Production interface selection ---
You wont be able to modify the production interface after initial configuration.
Select the production interface: 1
VA/VM difference
The VM mode configuration will be completed once you define the production interface.
VM mode does not allow you to configure IP addresses, static routes, DNS or NTP servers.
VM requirement
The production interface must already have an IP address.
If it does not, press Ctrl + C to abort the configuration and contact your system administrator to set up the VM network settings.
❖ Configuring interface: enp0s3
❖ Enter IP/mask: : 192.168.110.1/24
✅ Static IP set to: 192.168.110.1/24
❖ Enter the gateway IP (or leave empty for no gateway): 192.168.110.254
✅ Gateway set to: 192.168.110.254
Next you will be asked to define DNS and NTP servers.
If you want to be able to update Avalon through our servers, you are required to define a DNS server.
Defining a NTP server is also higlhy recommended but a default sever will be used if you leave it blank.
❖ Do you want to add a DNS server? Y/n: Y
❖ Enter DNS server IP: 8.8.8.8
✅ DNS server added: 8.8.8.8
❖ Do you want to add a DNS server? Y/n: n
✅ Interface enp0s3 updated
Applying network changes...
Network configuration applied successfully.
❖ Enter a NTP server FQDN (optional, leave blank for default NTP server):
Configuration complete.
Now the configuration is complete and you will see the status of the VA:
- Avalon Manager status
- Avalon volume status
- Docker process status
- Avalon's configuration (FQDN + containers' subnet)
=== Avalon Appliance Status ===
INSTALLATION_MODE: va

Services:
  Avalon Manager: active, available at https://va1.avalon-nap.com:8443
  Avalon volume: mounted
  Docker: active

=== Application configuration ===
  FQDN: va1.avalon-nap.com
  SUBNET: 172.16.0.0/27
  GATEWAY: 172.16.0.30
Right after the status, you will see the Avalon Shell prompt.
[Avalon Shell]#
Avalon Shell
Avalon Shell is a restricted shell that will only allow avalon-user to take four actions:
- change its password
- display the VA status
- run the configuration script again
- reboot the VA
Note
Completion is disabled in Avalon Shell
You can use ? or help to display the available commands:
[Avalon Shell]# ?

═══════════════════════════════════════════════
        Welcome to the Avalon Shell
═══════════════════════════════════════════════
[?] or [help]         Show this help message
[avalonconfig]        Run Avalon configuration
[avalonstatus]        Display Avalon status
[passwd]              Change your password
[reboot]              Reboot the server
[exit]                Exit the shell
═══════════════════════════════════════════════

[Avalon Shell]#
You can run the configuration script, which will display different options depending on what you want to modify and the installation mode.
The passwd command refers to the standard Linux password command.
Configure Avalon Manager
Now that your VA/VM is ready to use, it is time to configure Avalon Manager. The URL will be displayed at the end of the initial configuration and can also be shown again using the avalonstatus command.